If you own a wood flooring, we guess that you probably know and understand how much of importance treatments like wood floor sanding and re-finishing have. Both of these hardcore and heavy-duty maintenance treatments are highly recommended every now and then and in order to achieve visual and improvement in the condition of your wooden floor, no matter if solid, engineered wood or parquet. That is right, engineered wood and parquet patterned flooring can also be sanded and re-finished successfully, so there is no escaping from this responsibility and duty. So when the right time comes and you start noticing your wooden floor requiring extra attention and care, make sure to hire some professional help, or do your research and start planning a DIY project.
Signs That My Wooden Floor Needs a Sanding and Re-finishing Treatment
Many owners feel the confusion of not knowing the exact time a wooden floor is in serious need of some improvement. We wouldn’t blame them, although floor sanding service is not rocket science, it is still a controversial, confusing and even intimidating topic that is hard to analyse for the untrained and unprofessional eye. Estimating the current condition of the floorboards is not a skill and knowledge you are born with, so even with the slightest feeling of you not being completely sure, consider discussing the topic with a reliable and experienced contractor and ask for inspecting and estimating your wooden floor. In fact, even when there are any noticeable and dramatic issues and imperfections, your floor might be in need of some extra attention, so do not underestimate the importance of professional advice and recommendations.
Next, if you feel confident enough to inspect your own floor and look for signs of wear and tear and other imperfections, here is what you will expect to notice:
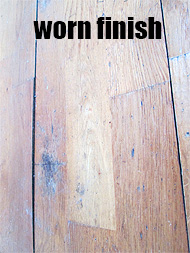 Worn finish – The main idea of floor sanding is stripping off the top layer of your floor that is mainly a floor finish. With time and due to a number of factors, mainly due to high traffic, heavy footfall, everyday use, etc. and the finish will start experience wear and tear to the point, where if you neglect it for longer you can start noticing spots and patches of completely bare wood, where the protective power of the finish is weakened, or does not exist at all. Remember that you need to re-finish your floor with the same type of finish applied previously. If you are not sure about the type of finish, here is how you can identify – scratch a small hidden spot of the surface with a coin or a metal object and if it chips off, this is a surface finish like varnish or lacquer. Otherwise, you can place a few drops of water on the floor and if white spots do appear you have a penetrating finish (oil-based or wax). You can identify wax finish by wiping an inconspicuous spot with a white rag with a small amount of ammonia. If the rag turns yellow or brownish, your finish is wax.
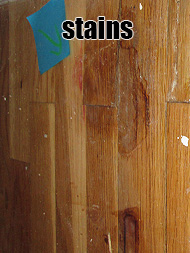
- Chipping, flaking and bubbling are signs of worn or damaged finish too.
- Fine scratches and surface stains affect the entire appearance of your floor, but you can get rid of them with the help of sanding.
- Dullness or fading of the original colour can be results of high traffic or sun exposure. These imperfections usually affect the surface finish only and can be easily removed along the sanding process.
- Generally, a sad, tired and worn look is a sign reminding you that re-sanding is much needed. In case your wooden floor looks like a patchwork quilt and this is not your genuine intention and liking, in order to get a uniform, even, smooth and fresh look, refinishing is the way to go.
How Sanding Will Help For Wood Floor Improvement?
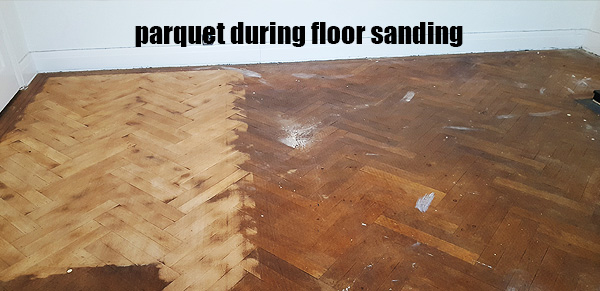
As we have already mentioned, sanding is the process of stripping off the top surface layer of your wooden floor with the help of varying in density and intensity of grain sanding paper. While removing the worn finish, it can also remove a thin layer of the top of the bare wood underneath, in case it is needed and depending on the thickness of the wooden boards. It's recommended every now and then, while it can happen up to 6-7 times in a life of solid wood timber and up to 4 times in a life of engineered wood planks. The improvement method is also recommended for newly installed and unfinished wooden boards, because the process opens the pores of wood’s structure and the finishing product can be absorbed better, adding a lot of strength and protection.
How To Prepare My Home For a Sanding Service?
Let’s say that you are already at the point considering initiating a wood floor restoration service. In order to ensure a smooth experience and be able to enjoy great results, you need to consider a proper preparation, no matter if you are hiring a specialist contractor or you are DIY-ing. Unfortunately, sanding is popular for being a messy and stressful experience, but this is only half of the truth, because the process can run really smoothly, almost-completely dust-free and entirely stress-free and to this contributes the good preparation too. So without further ado, let’s have a look at a…
Wood floor sanding pre-steps checklist:
- Plan ahead – Scheduling the whole process will help you a lot and minimize the disruption to the day-to-day life of the whole household. In fact, home renovation services never feel like visiting a SPA salon, but you can always make sure to make the whole experience as smooth and bearable as possible. If you are hiring a professional contractor, make sure to ask for the schedule the sanding team will follow. If you are planning it as a DIY project, your schedule depends on you, so be smart with it. Furthermore, although there is no need to do so, but if you feel that the members of your household won’t feel good at home, while the sanding process is running, book a hotel room for a few days.
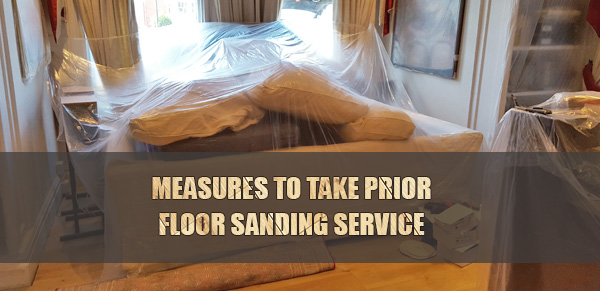
- Remove furniture and rugs – It is very important to relocate all furniture pieces, decorations, hanging art, rugs and small knick-knacks outside the room, where refinishing is planned. Some professional services offer removing furniture outside the room for free too.
- Stock on plastic sheets – Although modern sanding methods guarantee almost completely dust-free experience, make sure to cover windows and doors with plastic sheets that will work as a good barrier for saw dust entering the rest of the house.
- Ensure good ventilation – The drying process after the final application of finishing product can take up to a couple of weeks. The better ventilation you have in the room, the faster the finish will get dry.
- Clean – Pre-cleaning your floor is as important as cleaning after each stage of the sanding process. You do not want dust and dirt particles scratching the bare wood or staying trapped in the finish forever, right? Use a powerful vacuum machine and a mop damped into a bit of water and a cleaning product that is designed for wood flooring only.
- Inspection – While estimating the condition of your floor, look around for popping head of nail and hammer them down, otherwise the sanding machine can catch them later and leave serious dents and scratches. All minor repairs your floor might need are recommended to be finished before the sanding process starts including gap filling, nailing or gluing down loose boards, etc. Speaking of repairs and improvement …
Whether or Not To Paint The Walls Before Wood Floor Sanding?
If you are planning a more serious home improvement project, you might want to refresh and paint your walls too. Make sure to schedule the wall decorating part before sanding, so if there are some minor paint spills happening, they will get removed throughout sanding.
Here is an advice for all DIY enthusiasts out there – gathering all required tools and products prior is important and will save you a lot of time and energy. Considering the fact that you are probably going to rent the equipment, be sure to pick them up from your local store or flooring showroom at least a day before you start the refinishing project. Here is a checklist of all tools you will need for a DIY wood floor sanding project:
- Cleaning materials – a vacuum machine, a mop, warm water, soft liquid soap or cleaning product designed for wood
- Pry bar – You need a pry bar for removing all skirting and baseboards in order to protect them from scratches and dents.
- Belt sander
- Sanding edger – You need a sanding edger for sanding all those nooks and corners of the room that the chunky and big sanding machine won’t access.
- Sanding belts – You need a variety of sanding belts with sanding paper with different density of grain.
- Carbide paint scrapper – You need it for sanding by hand certain spots that the sanding machines cannot reach to.
- Buffer
- Wood floor finish and tools for applying it
